Category Archives: Instructional

Learning to Play “By Ear” Using Chord Progressions!

Being a long-time music teacher, I have found out that my students tend to do better learning to play “by ear “in any key when they learn chords and then learn to use those chords in chord progressions!

Why?  Once the student learns a chord and its inversions, they need to immediately start learning to use that chord in a progression or they will just be learning a bunch of chords and not learning how to USE those chords to play a song.

Start with just the basic progression that every song has—the I, IV, V.

The I to IV

  • Start with the ROOT position of the I, then move UP to the closest or the most logical move to the IV.
  • Be aware of what notes move up or down and half or whole steps.
  • Be aware of HOW THIS MOVEMENT sounds so you can identify it later when listening to another song.
  • Usually the IV sound “lifts” or moves higher.
  • If the melody line notes move 1, 2, 3, 4 it is a clue that you are will probably be moving to the IV.
  • If you are starting with the ROOT position of the I, you will probably move to the 2nd inversion of the IV.
  • NEVER move from the ROOT position of the I to the ROOT position of the IV. That is CHUNKY and sounds NASTY!
  • Make your chord progressions move smoothly and logically. Don’t make big GAPPY moves!

The I to V

  • Start with the ROOT position of the I, now move down to the closest or the most logical move to the V.
  • Be aware of what notes move up or down and half or whole steps.
  • Be aware of WHAT HOW THIS MOVEMENT sounds so you can identify it later when listening to another song.
  • Usually the I to V has a “dropping” or “lowering” sound.
  • The melody line notes may move, 1, 3, 4, 5.
  • You will be able to “imagine the sound” of the left hand moving down 8, 7, 6, 5. At first you may need to make the left hand movement, but it can sound “dorky” so you don’t want to get into the habit of doing that movement whenever you move I to V.
  • NEVER move from the ROOT position of the I to the ROOT position of the V. Think CHUNKY and NASTY!
  • Make your chord progressions move smoothly and logically. Don’t make big GAPPY moves!

© 2018 Pamela Rentzel – www.pentecostalmusicians.com/PMblog/

Join us on Facebook at “Play This – Not That!”

Relative Pitch

by Pamela Rentzel

Many people think it’s a GREAT mystery or a GIFT to play an instrument by EAR!  Not so!  You can learn to play or sing by ear but just learning to listen!

So, my CHALLENGE to you in 2018, is to start a plan that will help you HEAR intervals!  It’s one of the BEST things you can do when learning to play the keyboard, sing parts or play any other instrument for a Pentecostal church service!

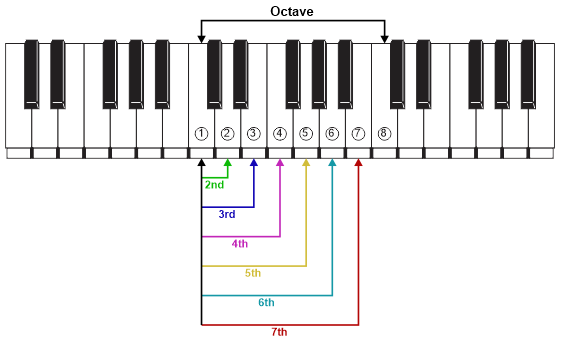
Let’s talk about the INTERVALS!  An Interval is the distance between notes!

In the Key of C:                                  

  1. C to D – Major 2nd – up one whole step – sounds like “at the cross, at the cross.” or “to be like Jesus” (1, 2, 3, 4..)
  2. C to E – Major 3rd – “sweet hour of prayer
    ” or “just as I am”

    1. Sometimes the 1 (one) can be just an “understood” interval without using the 1 – starting on the 3rd – “in the name of Jesus, (we have the victory).
  3. C to F – Perfect 4th – “stand up, stand up for Jesus” or “Here comes the bride.”
  4. C to G – Perfect 5th – “there is a fountain.”
    1. Again the 1 (one) can be “understood” without being used; example is: “I’ll fly away, oh glory, I’ll fly
      ” or “He touched me”
  5. C to A – Major 6th – “my Bonnie lies over the ocean” or “I see a crimson stream of blood”
  6. C to B – Major 7th – half step below octave
  7. C to C – Perfect 8th – octave

C Scale 561X345

How to Practice!

  1. Sing each INTERVAL with your voice and play it on your instrument.
  2. Listen and memorize the relationship in the SOUND distance between the two tones.
  3. Feel the INTERVAL (distance) beneath your hand.
  4. Test yourself to see the progress you are making! (Remember to shuffle them up so you are not just memorizing them in order!)
  5. Continue to work on all the INTERVALS in other keys.

Identifying these intervals will not happen overnight!  It’s a PROCESS which requires being consistent in working on them.

Listen and become aware of melodies and INTERVALS in the music you hear on the radio, etc.

Next, work on the half-step intervals starting with the 1st to MINOR 3rd as this interval is vital in good musicianship.

I have found a very good app for helping you through the process. It’s called RelativePitch.  It’s a freebie with the option to upgrade.

Start NOW and see how much better your EAR becomes this year!

© 2018 Pamela Rentzel – Pentecostal Musicians

B is For BAD!!!!

I’ll be candid with you – I REALLY DON’T LIKE TO PLAY THE KEYBOARD IN THE KEY OF B!  So, if you think you’re odd because you want to transpose songs to Bb or C instead of B, you can stop being so hard on yourself because you’re in the majority!!!

Recently at church, one of my students was playing the keyboard and I was playing organ as we sang “Glorious” in the key of B.  Our Pastor had hinted that he would probably lead out into an “old school” chorus immediately after that song.  

Knowing that we could get “stuck” playing the “old school” chorus in B, I advised my student to “get out of B and into another key as soon as you can after we sing “Glorious”.   I didn’t have time to explain WHY.  Well—he delayed just a fraction of a second too long and guess what—the Pastor pitched the “old school” song in the Key of B!  My poor student just stood there like a deer in headlights and soon turned around and asked me “What key are we in?”  I just grinned at him and said “We’re in B!”  I didn’t have the heart to tell him “I told you so!”

Fortunately, after playing 100 years, I have been “stuck” playing in B many times and I know how to think through the progressions in the Key of B so we made it.  AND—after the first time through the “old school” chorus, I was able to catch the Pastor’s eye and gave a thumbs-up indicating that we needed to raise the song and he nodded.  So, we just smoothly moved into the WONDERFUL key of C!

Two lessons can be learned with this experience

  • Usually an experienced singer will PITCH in the KEY they HEAR being played.  So, if you want a song started in a particular key, get in that key and allow them time to HEAR that pitch.  Most people cannot pitch into another key when they are hearing another key being played.
  • Take the time to LEARN to THINK in EVERY KEY—at least the I, IV and V—JUST IN CASE!!!

Using Memory Tricks to Learn Chords and Progressions!

by Pamela Rentzel

I like to teach “memory tricks” when I’m teaching chords and chord progressions!  Why?  Because if the student memorizes the “trick” or “short cut” they can INSTANTLY play the chord when they see it on a chord sheet! 

I’ve been asked “doesn’t that affect the students desire or ability to learn music theory?”  Absolutely not!  If a student has a desire to learn music theory—they will take the necessary classes and investigate the necessary documents to learn the “whys” and “wherefores” of the underlying theory. 

Let’s be honest, many people who play “by ear” or “by chords” have no desire to learn music theory—which I find disappointing—but it’s their choice.  I would rather teach a student a “trick” or “short cut” which will allow them to use better chords and better chord progressions rather than listen to them play just the triads and basic chord changes within a key signature.

If you are an individual who wants to learn the theory and what makes music “tick” go for it!  It’s great!   If you play by ear or chords and just want to play well but not delve into the mechanics of music theory, then learn the “tricks” and “short cuts” so you can play well NOW.  Perhaps one of these days something will click in your brain and you’ll want to know the WHY as well as the HOW.  In addition, using the “tricks” and “short cuts” allows you to memorize chords and progressions without having to sit and calculate the formulas as you play! 

Help Your Child Be Successful in Learning Piano!

by Ashley Blankenship

How can I help my child be successful in piano lessons?

Tip One: Provide a good, in-tune instrument at home.

Having a decent instrument at home is vital to the success of any student’s lesson. Without a way to properly practice at home, your student will feel inadequate at lesson time and will quickly lose motivation and interest.

What has 32 keys, plugs into a wall and makes piano teacher’s crazy? Sorry parents but your cheap, run of the mill Casio just won’t do. I always allow beginner students to start out on a small keyboard. Give it six months and if they are hooked, it’s time to invest in a better quality piano.

Truly, nothing can substitute for the feel and feedback of a quality acoustic piano but if you should be looking at electronic options, always look for these important features: weighted keys, touch response and a fully functioning damper pedal!

Often, I come across quality pianos for sale or to give away. Stay tuned on this page for those offers. There’s no way around it, your child can’t learn to play baseball without a nice bat and can’t learn to play hockey without a good pair of skates. Your child needs regular access to a quality instrument to become a successful piano player.